
Bread Baking Glossary
All purpose flour
A refined “white” flour with a moderate protein level and gluten strength, good for general use and some breads, such as baguettes.
Frequently Asked Questions
Autolyse
Pre-mixing the flour and water in a bread dough recipe to begin the process of starch breakdown, bran softening, and gluten development before introducing the leavening (sourdough starter or yeast). See also saltolyse.
Frequently Asked Questions
Baker’s percentage
Baker’s percentage is a way to represent the ingredients of a recipe in relation to the amount of flour in the recipe. The flour is set at 100% and the ingredient weights (water, salt, yeast, sourdough starter, oil…etc) are divided by the flour weight to determine what percentage they are of the flour weight.
For example, 10 grams salt is divided by 500 grams flour = 0.02 or 2% salt in the following recipe. The baker’s percentages are given in parentheses next to the ingredient weights.
500g flour (100%)
350g water (70%)
100g sourdough starter (20%)
10g salt (2%)
Some bakers will further separate out the flour and water from a recipe’s sourdough starter, and add that flour and water to the total flour weight and water of the recipe. This is to say, they calculate baker’s percentages without the starter as a separate ingredient. Here is the recipe from above, recalculated this way:
500+50 = 550g flour (100%)
350+ 50 = 400g water (73%)
10g salt (1.8%)
Frequently Asked Questions
Baking stone / baking steel
A large sheet of stone or steel that covers an oven shelf and is preheated with the oven. Often used for ciabatta, baguettes, pizza, and other dough that doesn’t fit in a closed baking vessel. The stone or steel conveys significant heat to the dough as soon as it’s loaded into the oven.
Frequently Asked Questions
Baking vessel
An enclosed vessel such as a Dutch oven or clay baker that traps the steam created by the heating dough. The steam allows the crust to expand and then get crispy.
Frequently Asked Questions
Banneton
A basket that holds shaped dough during the final proof, helping keep the form of the final loaf. See also proofing basket.
Frequently Asked Questions
Bassinage
Bassinage is a French term for adding more water to dough that was mixed earlier and has already had some time to develop its gluten network. This allows the dough to hold more water than if all the water was mixed in at once.
Frequently Asked Questions
Bâtard
An oval-shaped loaf of bread, sometimes with tapered ends.
Frequently Asked Questions
Bench knife
A straight-edged metal rectangle with a handle that is used to move dough and to scrape the bench or countertop. Also called a pastry scraper.
Frequently Asked Questions
Bench rest
The stage of bread making after dough is divided and pre-shaped. The bench rest allows the gluten network to realign and relax before the final shaping.
Frequently Asked Questions
Blistering
Crispy bubbles that sometimes form on the crust of an artisan-style sourdough bread. Blistering is increased with a cold final proof and more refined flour in the dough relative to whole grain flour.
Frequently Asked Questions
Bloom
The opening of a score during the baking process.
Frequently Asked Questions
Bolted flour
Flour, usually stone milled, that has been sifted so that it has less bran than whole grain flour but more than refined flour. See also high extraction flour.
Frequently Asked Questions
Boule
A round loaf of bread.
Frequently Asked Questions
Bowl scraper
See dough scraper.
Frequently Asked Questions
Bran
The outer layer of wheat grains that is rich in fiber, essential fatty acids, minerals, vitamins, and other nutrients.
Frequently Asked Questions
Bread flour
A refined “white” flour, often used for making bread, with higher protein levels and gluten strength than all-purpose flour.
Frequently Asked Questions
Brotform
See banneton.
Frequently Asked Questions
Bulk fermentation
The first stage of fermentation of dough, ranging from a few hours to several days depending on the amount and dormancy of the sourdough starter used, the temperature of the dough and environment, and the type of flour in the dough.
Frequently Asked Questions
Clay baker
A clay or ceramic baking vessel that traps steam and tolerates high heat. Also called a cloche.
Frequently Asked Questions
Cloche
A clay baking vessel that traps steam and tolerates high heat. Also called a ceramic or clay baker.
Frequently Asked Questions
Coil fold
A method of developing the gluten in a dough during the bulk fermentation whereby you lift the dough out of the bowl, let the edges curl under, place it back in the bowl, rotate your hands 90°, and repeat several times.
Frequently Asked Questions
Couche
A linen cloth used for proofing dough of varied size and shape, such as ciabattas and baguettes. Channels are created by making folds in the fabric to support the dough.
Frequently Asked Questions
Crumb
The interior of a loaf of bread, often with the descriptors of tight or open, referring to the airiness of the bread. Some types of crumb include: fool’s crumb (a mix of very tight and big holes), honeycomb or lacy (evenly spaced and moderately open), and wild (a mix of moderate and very large holes).
Frequently Asked Questions
Crust
The exterior of the loaf of bread.
Frequently Asked Questions
Dough scraper
A plastic or silicone spatula that’s curved to fit a bowl and with a wide base to hold. Also called a bowl scraper.
Frequently Asked Questions
Dough whisk
A mixing tool of metal coils (usually three) on a relatively flat plane compared to a traditional whisk. A dough whisk glides through dough more easily than spoons. Also called a Danish dough whisk.
Frequently Asked Questions
Dutch oven
A baking vessel that traps steam and tolerates high heat. Dutch ovens are usually made of seasoned cast iron and enameled cast iron.
Frequently Asked Questions
Ear
A dramatically peeled back single opening of a score.
Frequently Asked Questions
Elasticity
The characteristic of gluten in dough that allows it to retract after being stretched.
Frequently Asked Questions
Endosperm
The portion of wheat grain that is the energy store for the seed, and the main part of wheat grains in refined flour.
Frequently Asked Questions
Enriched (dough or bread)
Enriched breads have ingredients like eggs, milk, sugar, oil, or butter in the dough. Examples include brioche, challah, babka, and much more. The opposite of an enriched dough is a “lean” dough, made from only flour, water, and salt.
Frequently Asked Questions
Extensibility
The characteristic of gluten in dough that allows it to stretch without snapping back. Some wheat varieties have more extensibility, such as spelt.
Frequently Asked Questions
Extraction
When wheat is milled, the extraction is the percentage of the grains that end up in the flour. For example, whole grain flour is close to 100% extraction because it is not sifted, and if 10% by weight of the bran was sifted out, the flour would be 90% extraction.
Frequently Asked Questions
Fermentation
The process by which yeast and bacteria break down and consume starch and sugar and produce carbon dioxide, alcohols, and other compounds.
Frequently Asked Questions
Final proof
The stage in baking during which the dough continues to rise and ferment in its final shape.
Frequently Asked Questions
First rise
See bulk fermentation.
Frequently Asked Questions
Germ
The part of the wheat grain that is the plant embryo. The germ is high in folate, vitamin E, and thiamin.
Frequently Asked Questions
Gluten
A group of proteins in wheat that are responsible for the elastic and extensible characteristics of dough.
Frequently Asked Questions
High extraction flour
Flour, usually stone milled, that has been sifted so that it has less bran than whole grain flour but more than refined flour. Extraction refers to how much of the flour weight remains after milling and sifting. See also bolted flour.
Frequently Asked Questions
Hooch
The liquid that forms on the top of sourdough starter, often when the starter has used most of the food supply.
Frequently Asked Questions
Hydration
The amount of water in a dough relative to the amount of flour. Hydration is calculated by dividing the water weight by the flour weight, e.g., 350/500 = 0.70, and multiplying by 100 to get the percent: 70%.
Frequently Asked Questions
Kneading
The traditional way to build gluten strength in a dough and ensure complete incorporation of the ingredients is to knead it. Methods differ, but kneading usually involves pushing the dough down and away from you on a countertop, folding it, and repeating.
Frequently Asked Questions
Lactobacillus
A type of bacteria that is part of sourdough fermentation. Lactobacillus converts the sugars in grains, fruits, and vegetables into lactic acid.
Frequently Asked Questions
Lame
A razor blade attached to a handle that’s used to score dough. (It is pronounced lahm.)
Frequently Asked Questions
Lamination
A method of building gluten strength, usually during the bulk fermentation, whereby you stretch the dough thin on a damp countertop and then fold it up and return it to the bowl.
Frequently Asked Questions
Levain / leaven
A chemical or biological agent used to create air pockets in dough or batter. Sourdough starter, commercial yeast, wild yeast, baking soda, and baking powder are all examples of leavening agents. The term levain is also used to refer to sourdough starter that’s been fed according to a recipe’s instructions and is then used in the mixing of the dough.
Frequently Asked Questions
Maillard reaction
A chemical reaction between amino acids and sugars that occurs on the crust of a bread as it bakes, creating new molecules that turn the color brown and result in toasty aromas and flavors.
Frequently Asked Questions
No knead
Bread recipes that involve an initial mixing of the dough and no active gluten development during the bulk fermentation. Generally, less starter or yeast are used in order to allow passive gluten development over time.
Frequently Asked Questions
Oven spring
The upward rise of a bread in the oven due to the carbon dioxide released in the dough as it heats up.
Frequently Asked Questions
Over-proofed
An adjective to describe bread that has fermented too long and has exhausted its food source. Over-proofed bread tends to be flatter, with minimal score bloom, but generally flavorful and not too dense.
Frequently Asked Questions
Pastry scraper
See bench knife.
Frequently Asked Questions
Pre-shaping
A stage in baking when the dough has finished its first rise, been removed from the bowl, divided if it was a large batch, and shaped into a ball (sometimes a tube) to allow the gluten network to reorganize before it’s formed into a final shape.
Frequently Asked Questions
Proofing
See final proof. Also called the second rise.
Frequently Asked Questions
Proofing basket
See banneton.
Frequently Asked Questions
Retard
To refrigerate dough during the bulk fermentation or final proof in order to slow fermentation, whether for flavor, schedule, or other preferences.
Frequently Asked Questions
Rubaud mixing
A method of gluten development at or shortly after the mixing stage wherein an edge of the dough is scooped up repeatedly.
Frequently Asked Questions
Saccharomyces cerevisiae
The most common species of yeast found in sourdough starter.
Frequently Asked Questions
Saltolyse
Pre-mixing the flour, water, and salt in a bread dough recipe to begin the process of bran softening, gluten development, and to a lesser extent starch breakdown, before introducing the leavening (sourdough starter or yeast). Including the salt at this point is believed to slow the usual starch breakdown (amylase activity) that would begin as soon as flour is hydrated. See also autolyse.
Frequently Asked Questions
Scoring
The cuts made with a lame or knife on the surface of a dough before it’s baked in order to direct the force of the oven spring to specific openings.
Frequently Asked Questions
Shaping
A stage of bread making when the dough is folded and formed into its final shape before the final proof.
Frequently Asked Questions
Sifted flour
See bolted flour. Also called high extraction flour.
Frequently Asked Questions
Slap and fold
A method of fully incorporating ingredients and building gluten strength at the beginning of the bulk fermentation. Slapping and folding dough involves smacking the dough on a countertop, folding it over itself, turning it 90°, and repeating. It’s usually done on wetter doughs like ciabatta and brioche, if a stand mixer isn’t available.
Frequently Asked Questions
Slurry Test
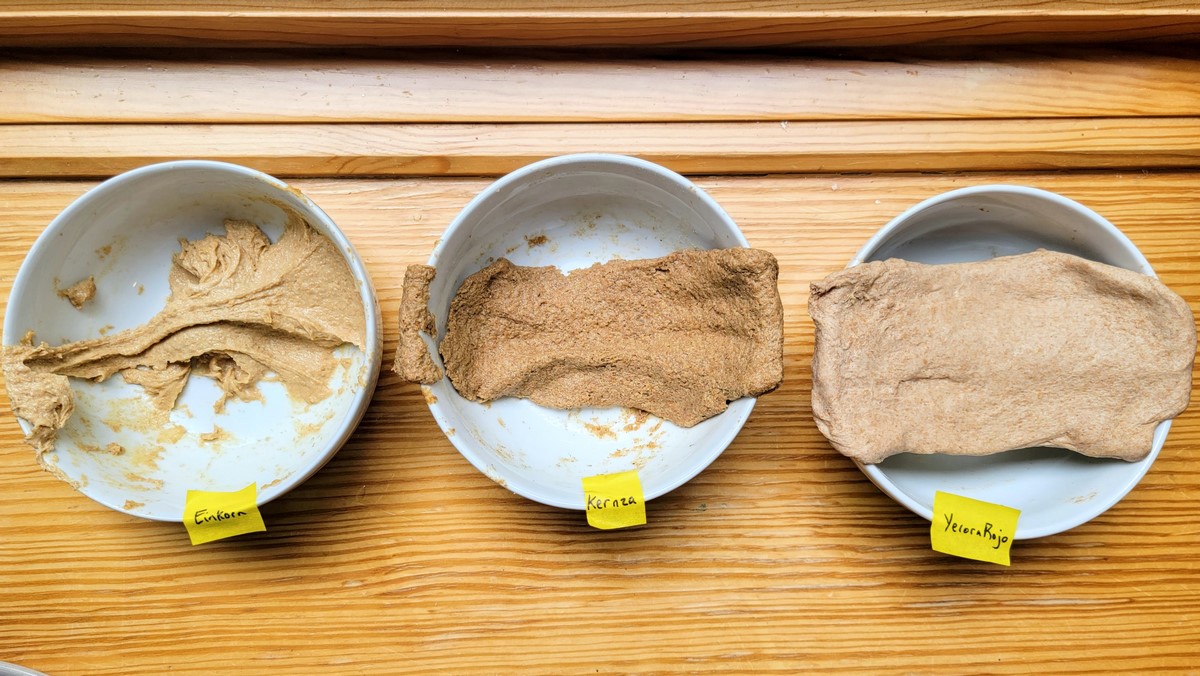
A slurry test evaluates the hydration needs, gluten strength, and enzymatic activity of one or more flours. Ideally, you have a control flour you’re familiar with in the test as a benchmark. You mix the flours with the same amount of water, and then assess the texture of the paste/dough and its stretchiness over time.
The observations are made right after mixing and at several intervals e.g. 30, 60, and 90 minutes because water uptake and gluten strength differ over time. Then a final evaluation is done 12+ hours later to determine if/how much the dough has broken down due to enzymatic activity.
In the photo above, the bowls have 50 grams flour and 38 grams water (76% hydration). You can learn more about this particular slurry test here: Baking Bread with Kernza Perennial Grain.
Frequently Asked Questions
Tangzhong
Tangzhong is the Chinese term for pre-cooking on the stove some of the flour and liquid in a bread recipe, similar to making a roux. This is done with anywhere from 4 to 10% of the flour in a bread recipe. The tangzhong flour-to-liquid ratio is usually around 1:5. Similar to yudane, this process gelatinizes the starches in the dough and allows it to hold more moisture. The bread stays soft and resists staling for longer.
Frequently Asked Questions
Tea towel
A dish towel with a smooth texture, rather than a terrycloth nubbiness. Floured tea towels are sometimes used to line a banneton.
Frequently Asked Questions
Thermal shock
The stress on and rupture of a surface due to a rapid shift in temperature, e.g., when an ice cube or sprayed water hits the hot glass window on an oven door, and the glass cracks.
Frequently Asked Questions
Under-proofed
An adjective to describe bread that hasn’t risen sufficiently, usually with a dense and gummy interior.
Frequently Asked Questions
Wheat
A grass that is cultivated for its seed, often milled into flour, and used to make bread, pasta, and more. Wheat is a worldwide staple food and has many varieties with different characteristics.
Frequently Asked Questions
Whole wheat flour / whole grain flour / whole meal flour
Flour that is made from milling wheat grains and not sifting out any of the bran or germ.
Frequently Asked Questions
Windowpane
Stretching a small portion of dough with your fingers to the point of seeing light through the dough. This is done as a test of gluten strength, often after mixing, kneading or other gluten development maneuvers.
Frequently Asked Questions
Yeast
A single-celled organism that converts sugars and starches to carbon dioxide and alcohol during the fermentation process. The most common bread yeast is saccharomyces cerevisiae.
Frequently Asked Questions
Yudane
Yudane is the Japanese term for scalding some of the flour in a bread recipe. Scalding flour is when you pour boiling water over the flour and stir. This is usually done with 10-25% of the flour in a bread recipe. The yudane flour-to-liquid ratio is usually around 1:1. Similar to tangzhong, this process gelatinizes the starches in the dough and allows it to hold more moisture. The bread stays soft and resists staling for longer.
Frequently Asked Questions
Bread Baking Questions
Can I bake an artisan-style bread recipe in a loaf pan?
Maybe you’re in the mood for a sandwich bread shape, but so far you’re only comfortable with our No Knead Sourdough Bread Recipe which uses a clay baker or Dutch oven. Or maybe there’s a neat artisan-style bread recipe you’d like to try but you want a soft crust for it.
Well, there’s no rule saying you can’t bake a artisan-style bread recipe in a loaf pan, but you should change the baking approach: time, temperature, and steam set-up. Also, depending on your loaf pan size, you may eventually decide to scale the recipe up or down.
The pan in the photos below is the USA Bread Loaf Pan in Medium (9 x 5 x 2.75 inches) and I find that it works for 850-1150g dough. That’s anywhere from 3 to 4½ cups of flour. This is a wide range because different wheat varieties and flour types will expand more or less.
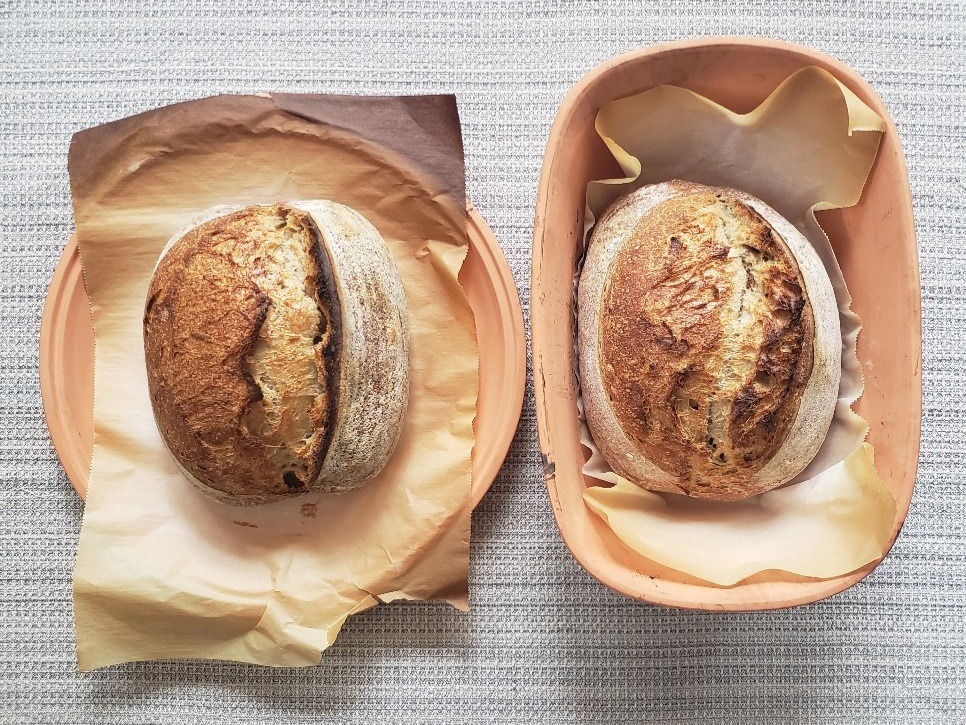
Here is the same Corn Porridge and Rosemary Sourdough Bread Recipe baked in a clay baker versus a loaf pan.
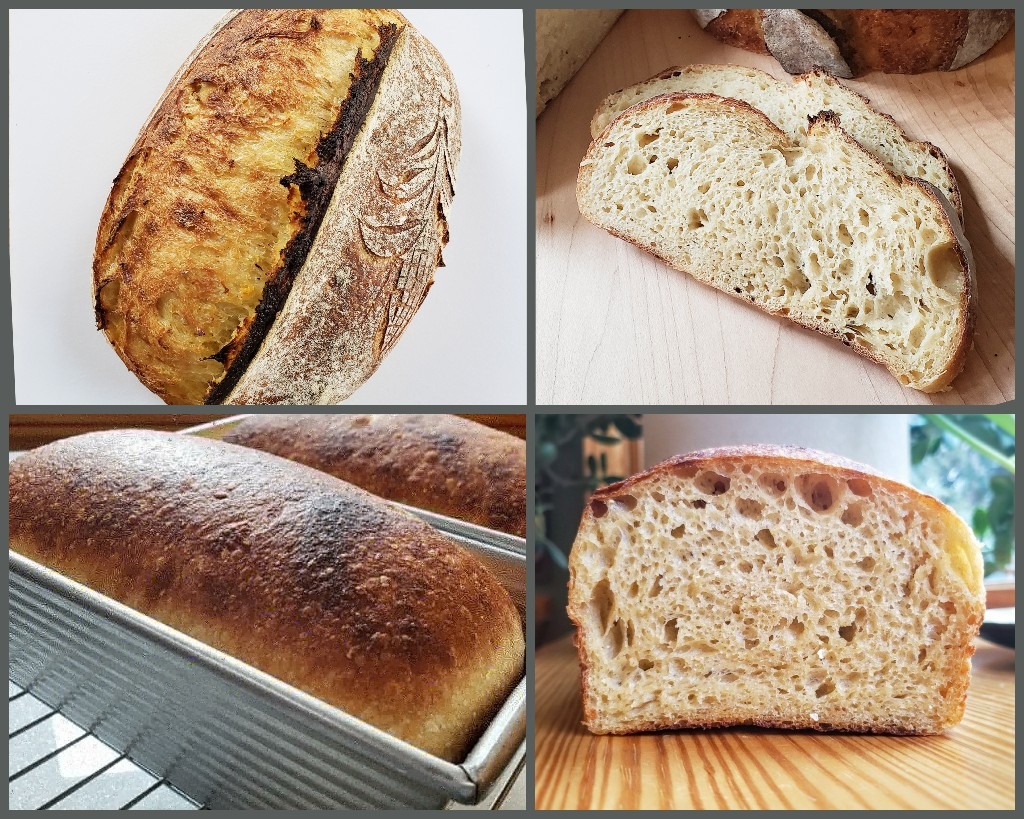
Same dough baked two ways
These loaf-pan breads above were baked for 20 minutes at 450F with a foil tent*, followed by 30 minutes at 425F with the foil off.
Another good option, which is used in this spelt sandwich bread is 50-60 minutes at 350F, without a cover, but to keep the crust steamy and expanding longer, brush the top of the dough with water (or milk) just before loading the pan into the oven.
Other steam systems work too, as does scoring the dough to control crust-bursting.
*To make a foil tent-cover, wrap the base of the pan to form the shape, and then tent it over the top of the pan, pressing to seal around the edges.
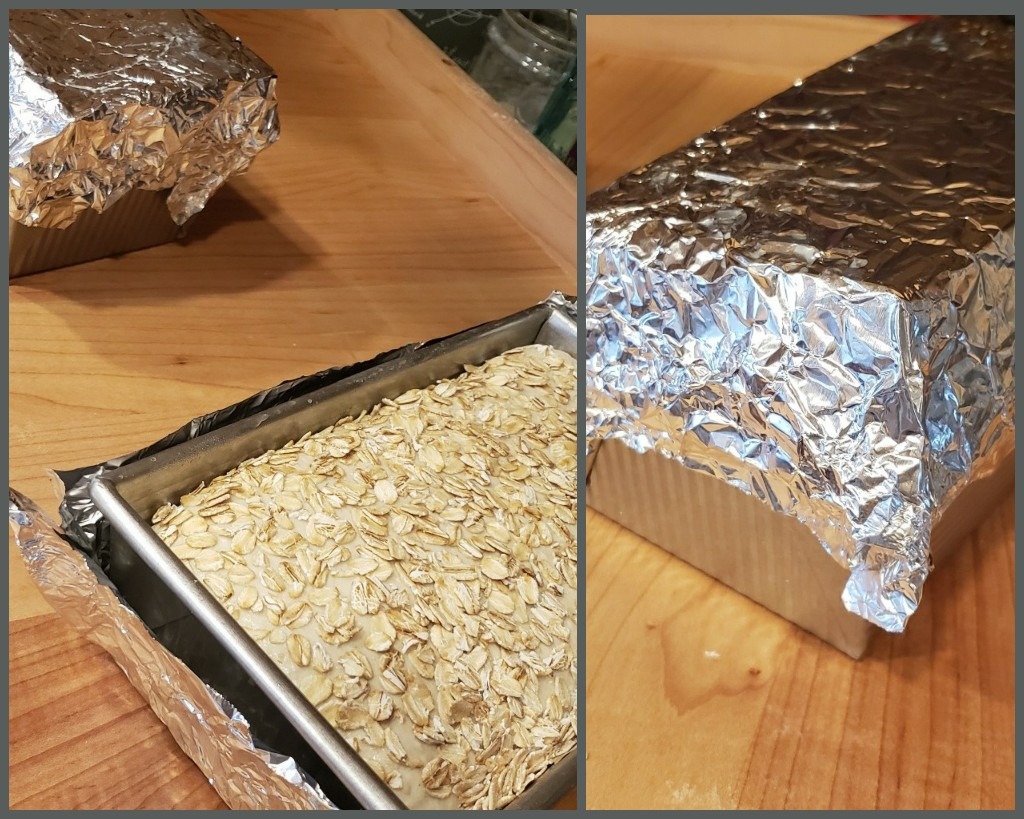
Forming the foil tent
Frequently Asked Questions
Does the lid on my ceramic baker need to be airtight?
The lid on your ceramic baker can shift and even have visible gaps in the seal, and plenty of steam will still be trapped during the first stage of baking. Your bread will come out quite wonderfully, like these two breads: one baked in the Breadtopia combo baker and the other in the batard baker.
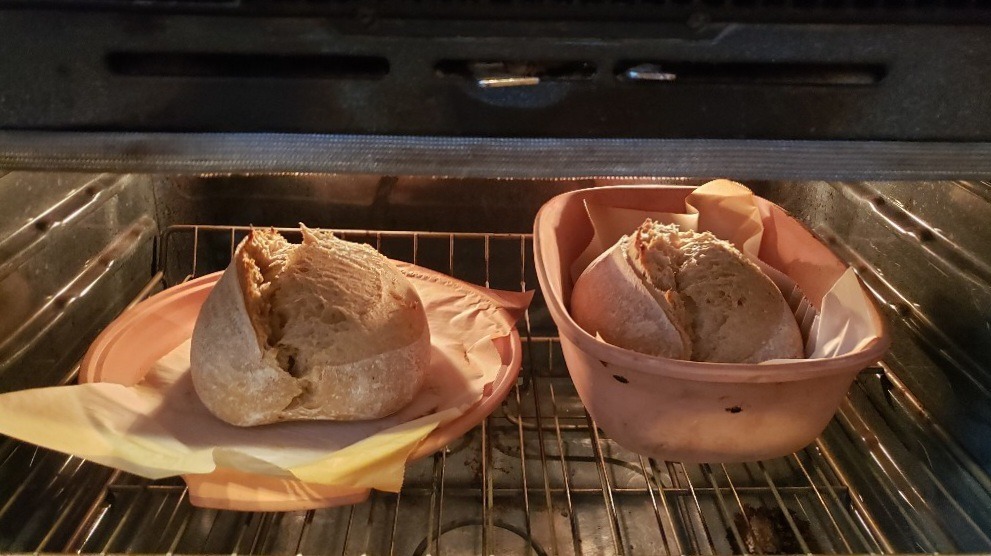
Lids removed after 20 minutes at 500°F
The combo baker, on the left, has some visible gaps where the lid and base meet, and the batard baker lid shifts and doesn’t click into place. This is perfectly normal, and the breads have great oven spring and crust development. When the ceramic heats up, it expands and this makes the lid and base fit more tightly than when the baker is cold.
Breads finished baking, another 15 minutes at 450°F
Frequently Asked Questions
How can I add things like nuts or cheese to dough?
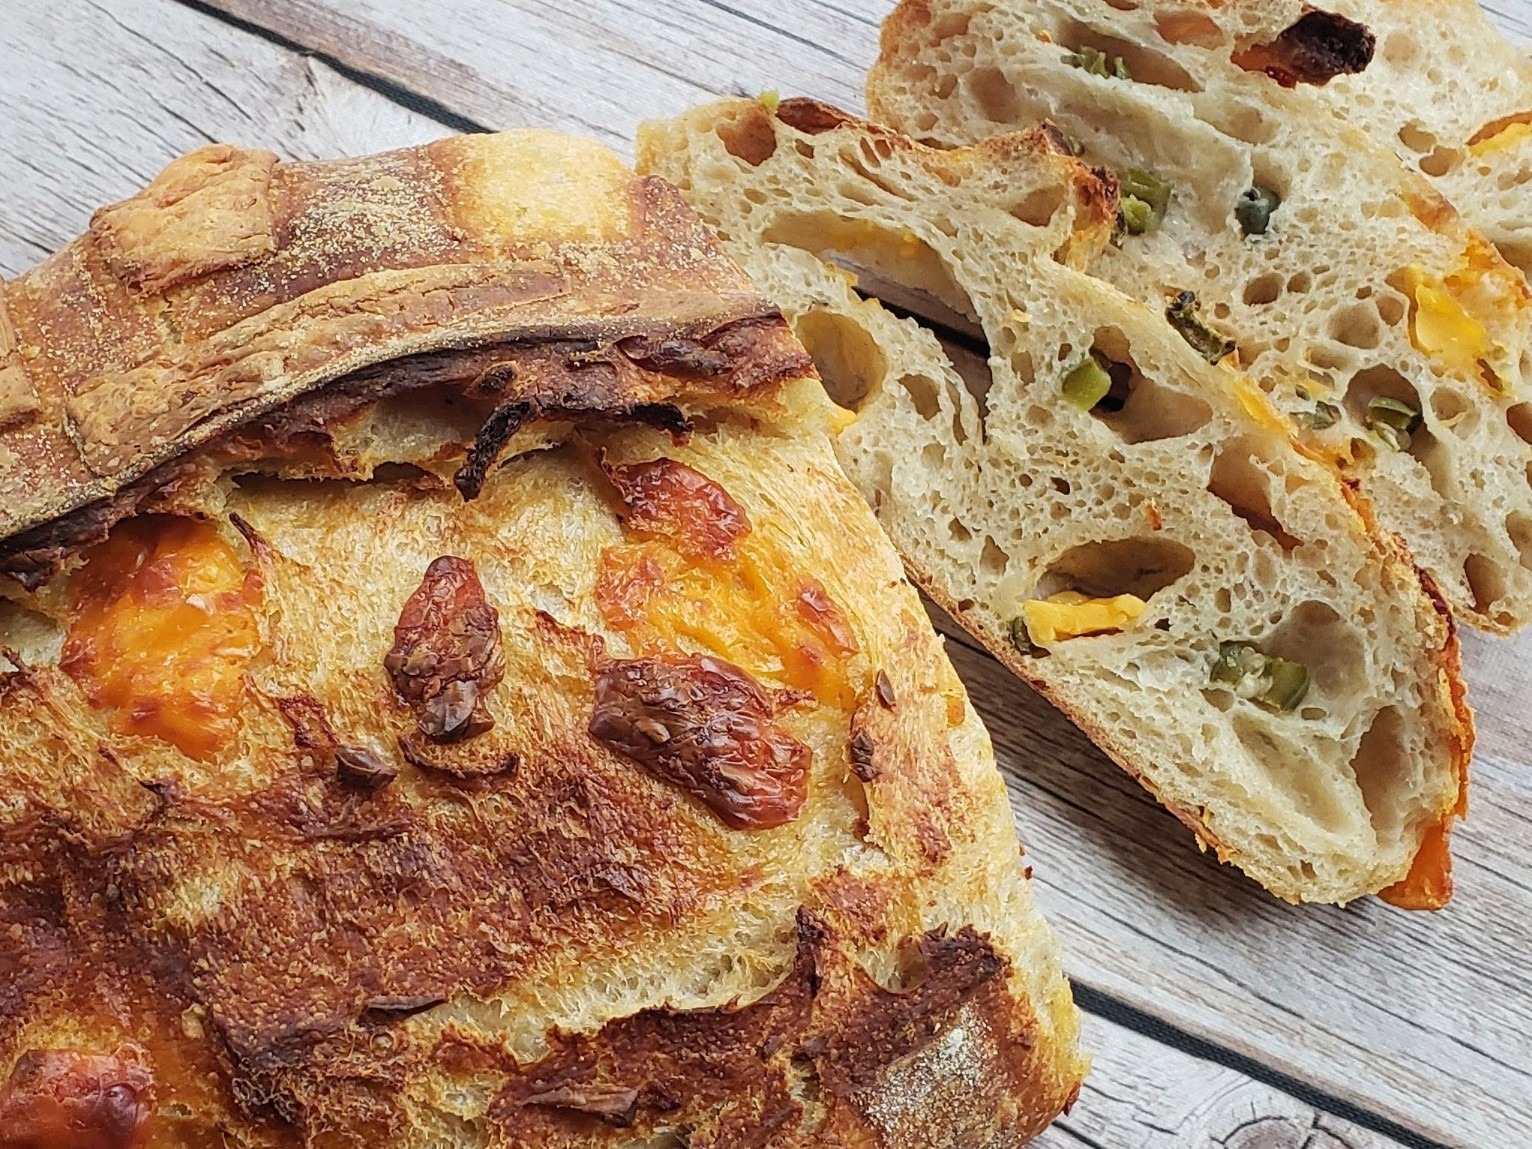
The cheddar cheese and jalapeño peppers in this loaf were added about 1 hour after I mixed up the dough
Sometimes I mix additions into dough right away; sometimes I wait until the gluten has developed a bit, about 1 hour; and sometimes I make a last-minute decision to add tasty extras at the end of the first rise.
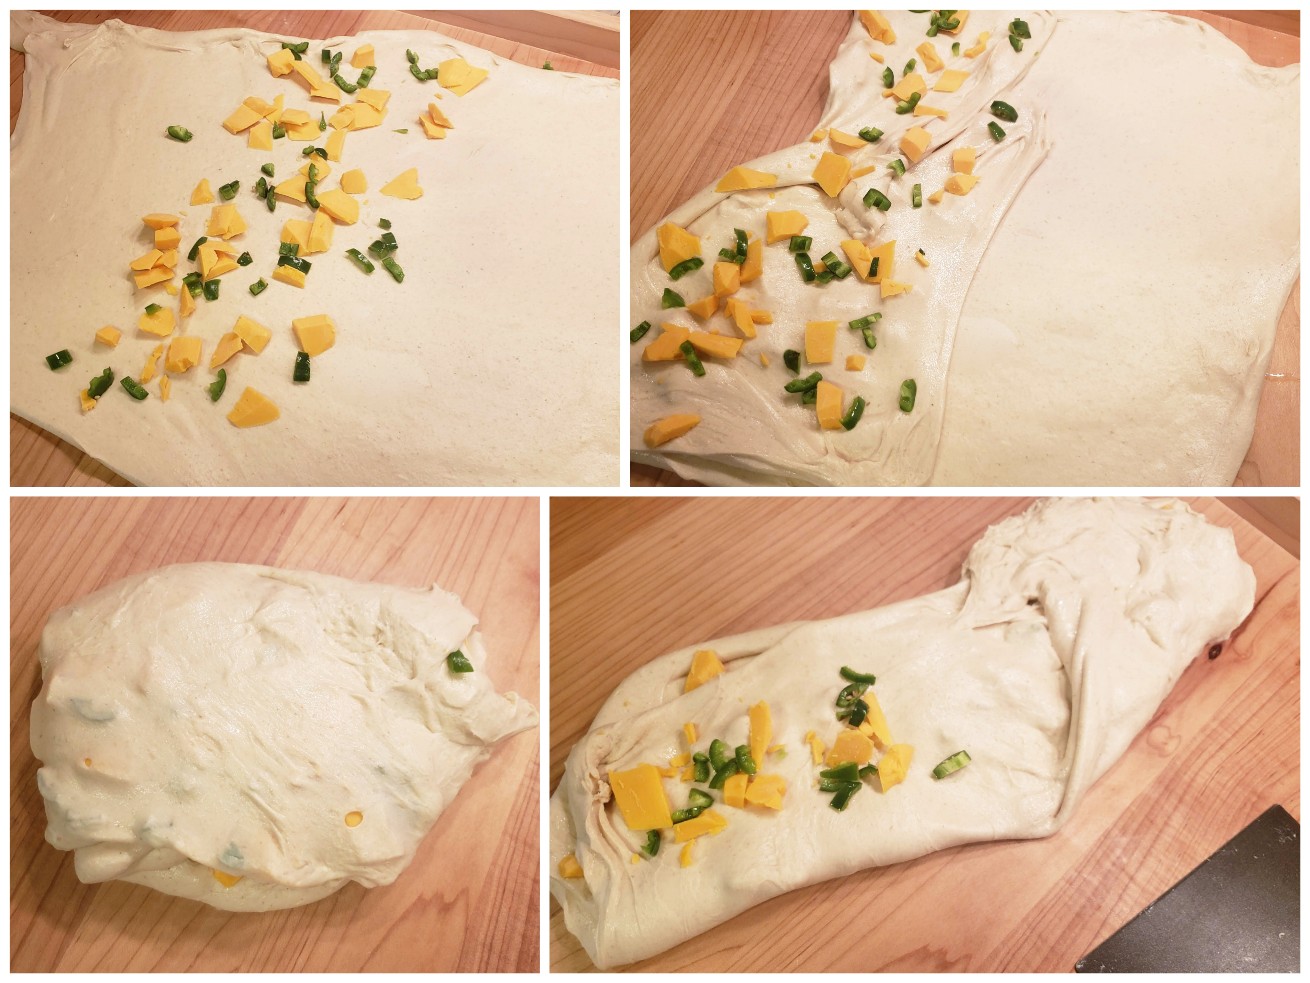
Here’s my favorite laminating method for getting additions into dough post-mixing. Clockwise from the top left:
- After stretching the dough into a large rectangle, lay additions down the center of the dough.
- Fold over a side of the dough, and place more additions on top of the fold.
- Fold over the other side of the dough, and place more additions on only half of the surface.
- Fold the dough half, into a square shape.
At this point, you have five layers of dough additions.
If you’ve done this lamination about an hour into the fermentation, you can let the dough rest for 20-30 minutes, and then do several more rounds of coil folding. And if you’ve done this at the end of the bulk fermentation, you can let the dough rest on the bench for 20-30 minutes, and then shape it.
Here’s the formula for this loaf of cheddar jalapeño sourdough bread if you’re curious:
325g bread flour
125g fresh-milled whole grain Kamut flour
340g water
160g ripe sourdough starter
8g salt
2 sliced, de-seeded, lightly sauteed jalapeño peppers
4 ounces of chopped medium cheddar cheese
Frequently Asked Questions
How can I calculate the right amount of Pizza Dough to make?
I’m having 6 people over for dinner and I want to make a sourdough pizza for each person. How do I make the right amount of dough?
You could search the internet for a recipe for six pizzas or find a recipe for say, four pizzas, and multiply it by 1.5 or download an app to do the math for you, or create a spreadsheet with the equations embedded in rows of ingredients.
Me? I like to start with a few basic rules and do the ingredient math from scratch. (The rules and proportions behind the math come from my experience making these two recipes: Sourdough Pizza and Whole Grain Sourdough PIzza, and you can learn more about the entire pizza making process in those blog posts.)

Here are my guidelines and ratios, followed by the calculations:
- The dough weight for a personal pizza (about the size of a dinner plate) is usually between 240 and 290 grams.
- 70% hydration works well, a little more or less depending on whole grain content, and this is modifiable during hand kneading
- Approximately 2% salt.
- Starter inoculation is determined by my schedule and inventory
- Optional: olive oil at <3%
- Optional: diastatic malt powder around 0.5%
Now let’s answer that 6 Pizza question:
I’m going to go with 260g dough per pizza and say I have 200g sourdough starter getting ripe in my jar. (I’m assuming a sourdough starter that is half water and half flour).
260 * 6 pizzas = 1560 grams total dough
Flour + Water + Salt = 1560 grams
Flour = x
Water = 0.70x
Salt = 0.02x
1x + 0.70x + 0.02x = 1560 grams
1.72x = 1560 grams
x = 1560/1.72 = 907 grams
Total Flour = x = 907 grams
Total Water = 0.70x = 0.70 * 907 = 635 grams
Salt = 0.02x = 0.02 * 907 = 18 grams
Starter = 200 grams
Recipe Flour = 907 – 100 (from the starter) = 807 grams (I then subdivide this between bread or tipo 00 flour and whole grain flour)
Recipe Water = 635 – 100 (from the starter) = 535 grams (I use this amount of water, but tend to add more flour or water if necessary for a hand-kneadable dough)
Finally add together all the ingredients in bold to check the total matches the target (1560 grams).
If you wanted olive oil and diastatic malt powder, the equation solving for x would be: 1x + 0.70x + 0.02x + 0.03x + 0.0005x = Total Pizza Dough Weight
Frequently Asked Questions
How do I keep dough from sticking to my proofing basket?
If your proofing basket or basket liner is new or just washed, make sure you flour your dough thoroughly before placing it in the basket, and that you flour the basket/liner quite thoroughly, too, even rubbing flour into the basket/liner surface.
Rice flour is especially resistant to sticking, and many bakers use it in their baskets alone or mixed with all purpose flour. Other less common options include using a layer of bran flakes, or for seeds or dried herbs for specialty breads.
Ideally, you’ll almost never wash your basket or basket liners, and they will become seasoned with a layer of flour. I think of this seasoning as backup dried sourdough starter or dried yeast. Washing isn’t necessary unless you’ve just had a sticking episode and need to scrub away chunks of dough that would dent the surface of your next loaf. Always allow your proofing basket to dry thoroughly before storing it so it doesn’t get moldy.
If you do find yourself with an extra wet and sticky dough, you can always use parchment paper in the basket as a one-off solution. I like to crumple the paper in my hands first, so it doesn’t have pointed folds that press into the dough.
You can find more tips on preventing sticking in these forum threads.
Frequently Asked Questions
How do I make my sourdough bread more or less sour?
Most people believe their sourdough starter is responsible for the acidity level of their bread, and it may indeed play some role, but the sourness is most influenced by the duration and temperature of the dough fermentation rather than the starter feeding schedule or flour type. A long cool fermentation will usually result in a more sour bread, and a short warm process tends to result in a less sour bread.
As long as you have a sense of what the dough should look and feel like at the end of your dough’s bulk fermentation and final proof, you can get to those points as quickly or slowly as you prefer via how much starter you put into the dough and the use of warmth or refrigeration.
Note that cold temperature compresses gas, so your refrigerated dough may be ready when it’s a smidge lower in the bowl or proofing basket than is typical for a room temperature rise. But if your dough hasn’t expanded much in the refrigerator during the first rise, don’t assume that it’s ready just because a long time has passed. Dough that’s refrigerated right after mixing is thrown into dormancy and will need multiple days in the refrigerator or many hours back at room temperature to fully ferment — unless the dough formula is heavy on the starter. For example. in this whole grain sourdough recipe, 556g ripe sourdough starter is mixed into a dough with only 505g flour, and the bulk fermentation is able to take place entirely in the refrigerator in only 24 hours.
Here’s some additional reading that may help you understand the variables at play and how to adjust your baking process so that your bread comes out with the flavor you want.
Challenging Sourdough Starter Convention
Experimenting with Different Flours in Sourdough Starter
Experimenting with Refrigerated Final Proofing
Frequently Asked Questions
How should you store, freeze, or mail bread?
See this blog post to learn about different options and guidelines for storing and freezing home baked bread, along with a few practical tips for mailing it.
Frequently Asked Questions
How to add seeds and whole wheat berries to bread
SEEDS
WHEAT BERRIES
Frequently Asked Questions
How to convert recipes between sourdough and yeast
Don’t let sourdough versus commercial yeast stop you from trying a recipe. As long as you’re willing to pay attention to the dough and ignore the recipe’s rising-time recommendations, you can make a yeast recipe with sourdough starter and vice versa. I’m going to use the term “starter” throughout these instructions to refer to mature levain/starter.
To convert a recipe and retain the same hydration, you just need to figure out how much flour and water are in the starter, and move that flour and water into different ingredient categories. Unless otherwise indicated, most starter is half flour and half water by weight, but if the starter is dryer or wetter, you would simply divide the starter differently.
Of course, this is just a basic approach to get you going. Once you mix up a dough, you might decide you want to add more flour or water. I believe the safest course of action is to make a recipe at least once as it’s written to get a sense of dough-feel at different stages, but you can dive right into a converted recipe if you prefer.
Sourdough -> Yeast: Divide the starter grams in half, and add those amounts to the flour and water weights.
Here’s an example of this conversion using our Savory Babka recipe:
Sourdough
- 275g flour
- 200g sourdough starter
- 125g milk
- 75g plain yogurt
- 5g salt
Yeast Conversion
200g sourdough starter divided in half is 100g flour and 100g water
- 375g flour (275g original flour + 100g flour from the starter)
- 100g water (+ 100g water from the starter)
200g sourdough starter- 125g milk
- 75g plain yogurt
- 5g salt
- yeast amount is up to you*
*Use as little as 1/4 tsp yeast to get a long rise similar to using sourdough. This will create more complex flavors and give you some hands-off gluten development. Or use 1 to 2 1/4 tsp yeast for the dough to double in 1 to 3 hours. (2 1/4 tsp yeast is equal to one packet.)
Yeast -> Sourdough: Decide how many grams of starter you want to use. 10-20% of the total flour weight is fairly typical. Then divide that starter amount in half, into flour and water weights, and subtract those amounts from the flour and water listed in the recipe.
Here’s an example of this conversion using our Bagel recipe:
Yeast
- 838g flour
- 486g water
- 17g salt
- 5g instant yeast
- 5g diastatic barley malt powder
Sourdough Conversion
I’m choosing 30% starter because this is a dry dough and I want a lot of leavening power:
838g flour x 0.30 = 250g starter
250 / 2 = 125g flour and 125g water
- 713g flour (= 838 – 125)
- 361g water (= 486 – 125)
- 250g sourdough starter
- 17g salt
5g (~1 1/2 tsp) instant yeast- 5g (~1 1/2 tsp) diastatic barley malt powder
If you don’t have a scale, make the recipe conversions in grams until you have your final ingredient list to avoid confusion, and then convert the grams to volume. Using the savory babka as an example again:
Divide the flour grams by 130 to get cups. 1 cup flour = 130g
375/130 = 2.88 cups flour
Divide the water and milk grams by 237 to get the cups. 1 cup water/milk = 237g
100/237 = 0.42 cups water
125/237 = 0.53 cups milk
You can find more weight-to-volume ingredient conversions online.
Frequently Asked Questions
How to prevent and remove mold on a proofing basket
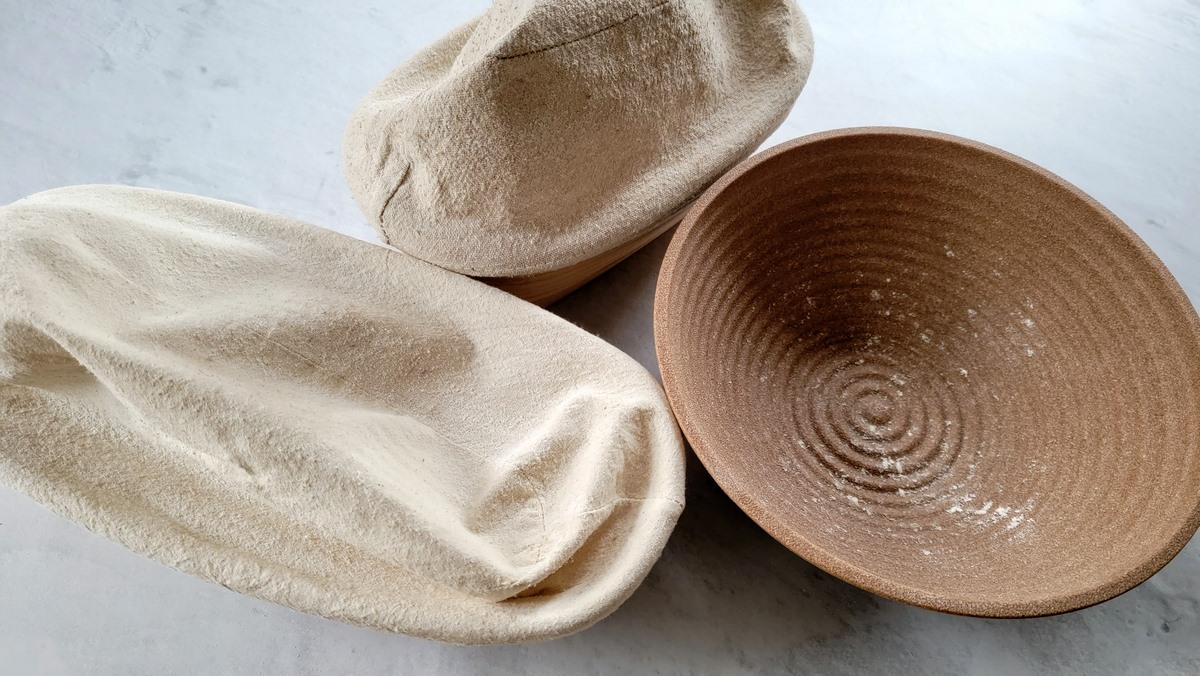
Liners on rattan baskets lifted to facilitate drying. Composite banneton washed and towel dried after use.
The best way to prevent mold from forming on your proofing baskets/bannetons is to dry them completely before storing. If you have multiple baskets, this means you should not stack them until they’re totally dry.
If mold does form on the rattan:
- Wash the basket with water, mild dish soap, and a soft scrub brush.
- Let the basket dry for several hours.
- Heat the basket in the oven for 45 minutes at 130°C/266°F to kill the mold spores. Oven time and temp is from this banneton guide.
If you want to avoid the risk of mold altogether — perhaps you live in a very humid climate where drying the baskets is difficult — you can use the Breadtopia Banneton, which is made from composite material and can be rinsed after each use and even put in the dishwasher.
If you use basket liners for either rattan or composite bannetons, they also need to dry completely before storing. You don’t need to wash the liners between each use though. The flour residue is a little like dry sourdough starter and it “seasons” the fabric. Over time, you won’t need to sprinkle as much flour on the fabric to prevent sticking. A few times a year, or if a dough sticks in chunks to the fabric, wash the liner in your sink with lukewarm water and mild dish soap. Avoid putting flour-coated liners in your washing machine with clothing as tiny flour bits will likely get stuck into your clothes.
Frequently Asked Questions
How to prevent bread from sticking to baking vessel during baking
Some bakers have reported that their bread sticks so strongly to the bottom of their Dutch oven or ceramic baker (e.g. La Cloche, Romertopf) that they destroy their bread trying to pry it out and then have to deal with cleaning the baking vessel. Not a desirable situation. (See this FAQ for how to remove the bread and clean the baker.)
Here’s what works to prevent it – either thoroughly preheat the baker before putting the dough it. “Thoroughly” is the key word here. We recommend allowing 25 to 30 minutes of preheating time before putting the dough in. 10 to 15 minutes is not enough, even if the thermometer on your oven reads a high temp.
Additionally, you can place a piece of parchment paper between your dough and the baker. Do this by laying the parchment paper over your proofing basket and then flipping the basket so the dough is centered on the paper. Lift the paper and dough to place them into the baker. If your baker is preheated, the paper will not stick to the bread, but even if it does, that’s much better than the dough sticking to the baker.
The parchment paper technique is critical if you want to start baking your bread from a cold start. A cold start is when you put the dough in your baker while it’s still at room temperature, and then put it in your oven and turn on the heat. Some bakers prefer the cold start method with parchment paper if –
1. they’re concerned about burning themselves trying to place the dough in a hot baker.
2. they want to proof the dough in the bottom of the baker and then bake it.
3. they find the dough so wet after the long proof that it’s hard to handle. In which case the wet dough can be virtually poured into a parchment paper lined proofing basket for the final proof and then lifted by the edges of the parchment paper and lowered into the hot baker.
Avoiding Dented Bread Edges
If you find that your stiff parchment paper dents the sides of your bread as it bakes, you can prevent this by crushing the piece of parchment paper in your hands and then smoothing it out before flipping the dough onto it. The paper will now accommodate to the shape of your dough rather than poke into it.
Frequently Asked Questions
How to remove stuck bread from a baking vessel and clean it
If you haven’t yet torn apart your loaf of bread by trying to pry it out of your baking vessel, put the cover back on the baker and return it to the oven. If the oven is still very hot, shut it off. If the oven is cold, set it to 350°F. Leave the bread in the hot oven for about 10 minutes to steam up the inside of the baker, then try to get the bread out again using a non-scratching spatula and oven mitts.
If you’ve already got chunks of bread stuck to your clay baker or Dutch oven, lay a wet towel over the bread chunks overnight, and then remove the softened bread the next morning. Make sure to let your clay baker thoroughly dry before using it again.
See this FAQ for how to prevent sticking with your next bake.
Frequently Asked Questions
How to Scale a Recipe
One way to scale a recipe is to compare the volume of the recommended pan with the volume of your pan. By dividing your pan volume with the recipe pan volume, you figure out the difference in size and how much to multiply each ingredient by to keep the ingredient proportions the same in a bigger or smaller dough.
An easy example for understanding this is if your pan is twice the size of the recipe’s pan. It’s obvious you should multiply the ingredients by 2 to get the recipe to work for your double-sized pan.
2 ÷ 1 = 2
Your pan volume ÷ Recipe pan volume = Ingredient multiple (the amount to multiply each recipe ingredients by)
To make this a more real-world example, let’s say you have the small USA pan but the recipe is written for the medium USA pan.
Your small pan volume = 8.5″ x 4.5″ x 2.75″ = 105 cubic inches
Recipe medium pan volume = 9″ x 5″ x 2.75″ = 124 cubic inches
Your pan volume ÷ Recipe pan volume = Ingredient multiple
105 ÷ 124 = 0.85
You’re going to multiply each recipe ingredient by 0.85
If the recipe were written for the smaller pan and you had the medium pan, the equation would be reversed 124 ÷ 105 = 1.18 and you would multiply each ingredient by 1.18
Frequently Asked Questions
Preventing a burnt bread bottom

If the bottom of your loaf is burning in its baking vessel while the rest of the loaf is adequately baked, here’s what many people do:
- Place a baking sheet directly underneath or on a rack below your baking vessel about halfway through the bake. This will deflect direct heat from the element on the bottom of an electric oven or the flame in a gas oven.
Some additional methods we’ve learned about through Breadtopia’s wonderful community of bakers on Instagram and Facebook include:
- Put a trivet inside the baking vessel under the bread about halfway through the bake.
- From the beginning of the bake, place your dough on a silpat, or on parchment paper and aluminum foil both.
- Fill a tray with lava rocks and chains or put a pizza stone on the bottom shelf of the oven to even out the heat of the oven.
- Put a pan of water under the baking vessel to deflect heat and steam the oven.
- When preheating the baking vessel, take the bottom out of the oven 10 minutes before loading dough so the bottom is much cooler.
- Take the bread out of the baking vessel halfway through baking and place it directly on the oven rack.
- Place uncooked rice on the bottom of your baking vessel (use parchment too). You can reuse the rice.
- Place rolled oats on the bottom of your baking vessel (use parchment too). You can use the toasted oats to feed chickens.
Finally, from a number of Breadtopia customers: Get a ceramic baker and the problem is solved!
Frequently Asked Questions
Preventing a gummy line at the base of sandwich breads
The gummy line at the bottom of a sandwich bread or pan loaf is fundamentally about gravity — the crumb structure sinks downward. This can be avoided with a quicker heat-set of the structure, different shaping, and fermentation timing.
Some strategies to avoid it include:
- Bake on a lower shelf to get heat into the bottom of the bread faster, to set the structure faster.
- Place a baking stone or steel on the lower shelf of your oven to act as a heat sink, and bake the tin directly on it. Make sure the oven preheat is long enough to fully heat the stone/steel.
- Remove the bread from the tin for the last 10 minutes of the bake.
- Cool the bread on alternating sides to prevent it from sinking like a souffle.
- Try a shape that has more upward and spiraling tension, such as the rolled lobes of the this hokkaido milk bread.
- Experiment with a more extensive bulk and less extensive final proof, and vice versa.
Frequently Asked Questions
Should I autolyse my dough?
Autolysing is combining the flour and water for a period of time before adding the sourdough starter and salt. It has a few benefits: enzymes are released that make the sugars more available for when you add the starter, it softens the bran in a whole grain dough, and it gets the gluten development going.
If your house is warm, your starter is lively, and you’re planning a relatively fast process, then autolysing the dough can be helpful to get a head start on sugar availability and gluten development. Also, if you’re making a dough with a lot of whole grain flour, autolysing the dough will help soften the bran before the fermentation process even starts. Try a short <2 hours autolyse if your home is warm, or use the refrigerator for a longer autolyse. Make sure you add the starter and salt gently, possibly with rests in between if the dough starts to tear.
If you plan long fermentation of your dough with some refrigeration during the first, second, or both rises, then most if not all the benefits of an autolyse are are achieved through the slower ferment. An autolyse won’t harm the dough, but it’s unlikely to add any benefit. Here are examples of two long process whole grain doughs Whole Grain Sourdough Rustic Country Loaf and Traditional Whole Grain Miche, and here’s a comparison bake experimenting with refrigerated final proofing.
Certain flours don’t benefit from an autolyse, and are possibly even harmed by it because their enzymatic activity is already high. Sprouted wheat and einkorn fall into that category in my experience. The dough begins to break down before the fermentation is complete. Rye has so little gluten that while you might get some benefit of bran softening from an autolyse, it’s not probably not worth the extra step for a mostly rye dough.
Here are some blog posts of experimental side-by-side comparison bakes of short vs. long autolysis and no autolyse vs. 3-hour autolyse for you to explore.
Frequently Asked Questions
What can I do with bread that comes out bad?
Sometimes you know something is off with your dough, but you cross your fingers and bake it anyway only to have your suspicious confirmed when you lift the lid on your baking vessel. You’ve got a brick, a doorstop, a frisbee. Whatever nickname you give it, this isn’t something you can simply toast and make all better.
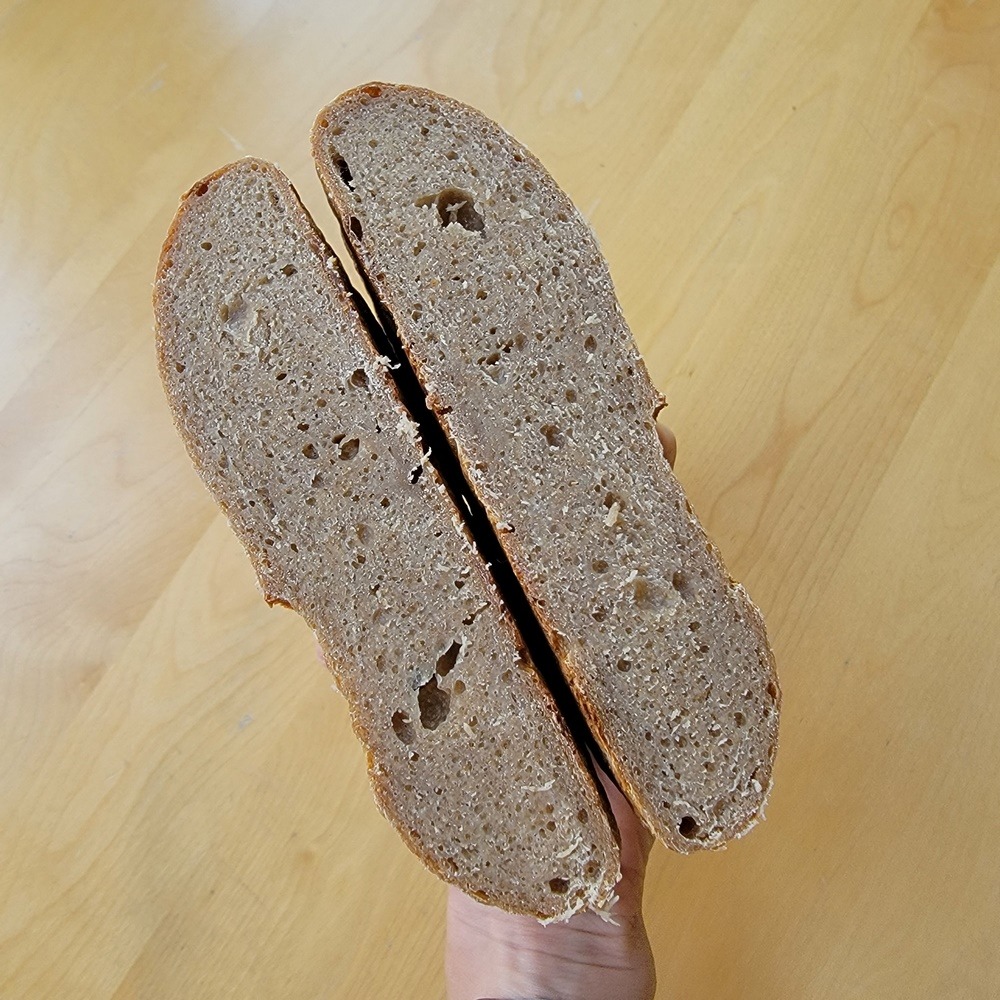
So should you toss the bread in the garbage? Compost it? Is there anything else you can do with it?
That depends. Once it has cooled down, take a bite of it. If the flavor is unappealing, then yes, toss or compost it. But if it tastes good, then you can make bread crumbs and/or croutons with it.
Bread Crumbs
Bread crumbs are useful for coating foods that will be fried e.g. chicken or fish. You can add bread crumbs to ground meat to make meatballs more tender, and also to soups and sauces to make them thicker.
Preheat your oven to 300F.
Cut the bread into small pieces, less than two inches on any dimension.
Pulse in a food processor until you have small crumbs. You may have to work in batches.
Spread the crumbs in a thin layer on a baking sheet.
Bake for 10 minutes, then toss and bake longer if needed to get the crumbs to be golden and dry.
Let cool completely and either store as is or put back the crumbs back in your food processor to grind into finer crumbs.
Storing the bread crumbs in the freezer is the best way to ensure they will last for a long time.
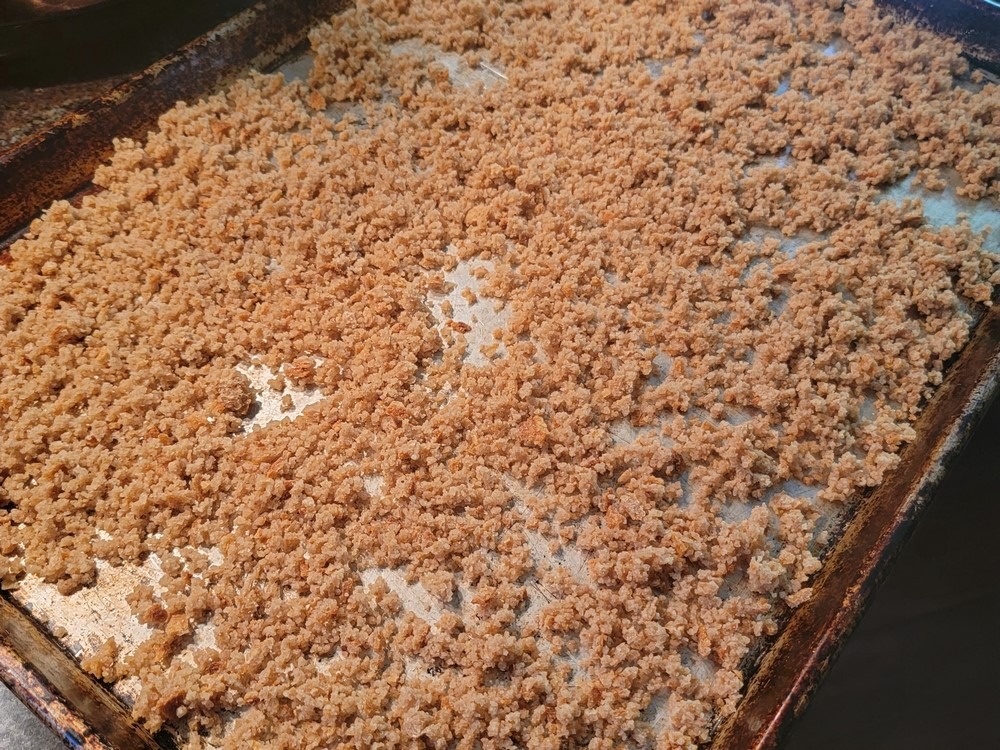
Crumbs before baking
Croutons
Croutons are tasty as additions to salads and soups. Note that some bread is simply too dense to be made into croutons. For example, the doorstop bread in the photo above resulted in croutons that were tasty but a bit too hard.
Preheat your oven to 300F.
Cut the bread in slices, then each slice into strips, and the strips into cubes.
Place all the cubes in a bowl, toss with olive oil, herbs, spices, and salt. _Quantities are to-taste. Some options to choose from include garlic powder, paprika, oregano, parsley and much more._
Spread the oiled and seasoned cubes on a baking sheet.
Bake for 20-35 minutes or until the croutons are toasted and crunchy. The bake time varies significantly depending on the moisture content and density of your bread cubes.
Once cool, store in a closed container and use within 3-4 days.
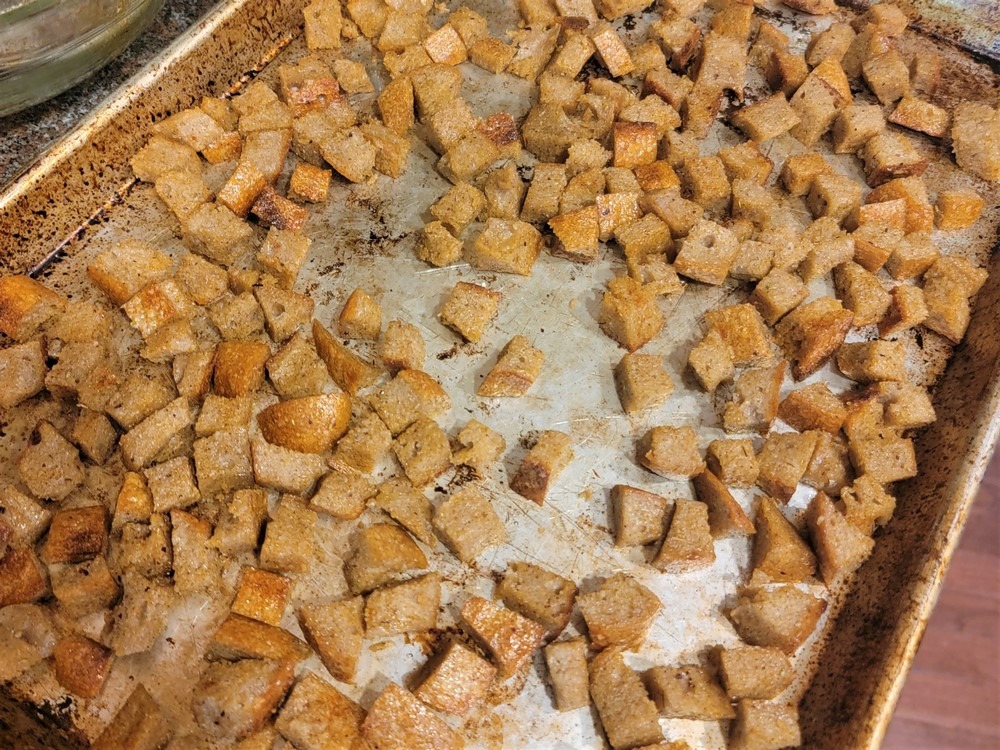
Croutons before baking
Frequently Asked Questions
What if I don’t have a Clay Baker or Dutch Oven?
- High temperatures are needed to maximize oven spring (expansion) of the dough and make the classic crispy crust.
- These baking vessels have high thermal mass, so their heat doesn’t quickly dissipate when you place your cool dough on them or when you open your oven door.
- These baking vessels trap the steam given off by the dough as it warms up. The steam allows the crust to stay soft and expand during the first 5-10 minutes of baking, before the bread structure sets and the crust hardens.
If you find yourself without a Clay Baker or Dutch Oven, here are some possible workarounds. You can use:
- A pizza stone or baking steel as a base, with a roasting pan base or steel bowl as a lid/dome over the dough.
- An entire roasting pan as your vessel. (This does not have high thermal mass.)
- A pizza stone or baking steel as a base, and then add steam to the oven with the method described in this ciabatta recipe or this baguette recipe. This will require some trial and error.
- The enameled ceramic inner bowl of a slow cooker with aluminum foil or a baking sheet as the lid. (Only the bottom of this setup has high thermal mass.)
Make sure that whatever you use is heat resistant up to 500F or whatever temperature you plan to bake at.
Frequently Asked Questions
What size proofing basket should I use?
For artisan style breads, most people do the bulk fermentation (first rise) of their dough in a bowl that is big enough for mixing and stretching and folding, and the final proof in a proofing basket, also called a banneton. This is a container that’s only a little larger than the shaped dough. It can be lined with fabric or unlined, and it’s floured or sprinkled with bran flakes to prevent sticking.
Proofing baskets allow the dough to expand during the second rise and be supported in the shape of the eventual loaf of bread. To get the dough out of the basket and into your baking vessel, you will invert the basket onto a piece of parchment paper, onto your floured palm, or directly into your hot baking vessel.
The size proofing basket you get depends how how large of a bread recipe you are making. Here are some guidelines:
Small proofing baskets / bannetons
Standard proofing baskets / bannetons
Keep in mind that whether the dough is made of refined flour or whole grain flour will impact how much it expands in the basket, and if you’ve arrived at the dough weight with additions like nuts and raisins or actual dough — so the ranges above are approximations.
Here are some videos of dough and Breadtopia’s standard size proofing baskets.
How to Shape Dough
How to Score Dough
The recipe for the dough in these videos is here if you’d like to see the ingredient amounts.
Frequently Asked Questions
Why do some people say they can only eat bread in Europe?
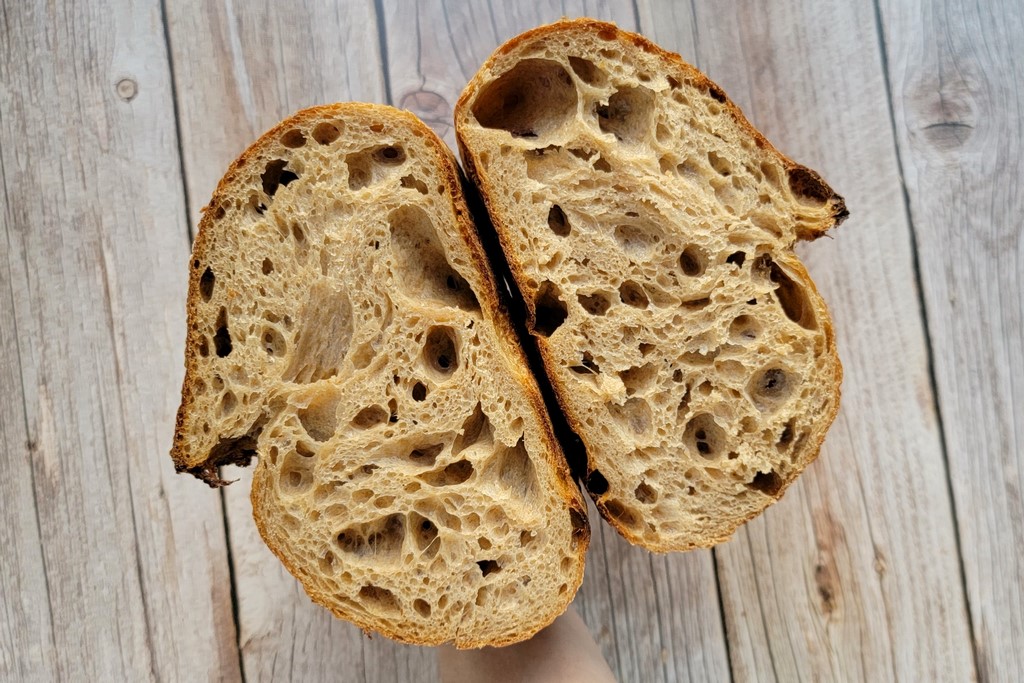
Naturally leavened organic pain de campagne with heritage and modern wheat flours
You may have heard people say, I can only eat bread when I’m in [insert European country here] otherwise it bothers my digestion. Here are a few reasons why this may be the case.
- The person could be eating bread made with only heritage wheat when they’re in Europe. Research into wheat digestion (American Chemical Society) indicates that modern wheat doesn’t impact the gut barrier nor increase inflammatory markers more than heritage wheat, but individual human experience may be different. Some people report easier digestion of ancient and heritage wheats. Modern wheats are the varietals from breeding programs in the second half of the 20th century that increased yield via ease of harvesting and disease resistance. The wheats/flours you can pick from our shop that aren’t modern include: red fife, turkey red, rouge de bordeaux, white sonora, pima club, kamut, khorasan, durum, rye, einkorn. You can learn more about their baking properties and flavors in this Newbie’s Guide to Flour for Bread Baking.
- Perhaps the person is only eating bread leavened with sourdough starter rather than commercial yeast. Sourdough leavening can make bread more digestible on several fronts: increased breakdown of proteins including gluten, reduction of FODMAPs (fermentable short-chain carbohydrates that cause bloating for some people), and increased absorption of minerals via reduction of phytic acid. Learn more in the digestibility section of this research paper: Health Benefits of Sourdough (Colorado State University).
- It could be that the person is eating bread made with only organic flour when in Europe. Both the U.S. and Europe still use glyphosate, an herbicide introduced in the 1970s, when harvesting non-organic wheat, although the EU seems farther along in working to ban it. Research indicates glyphosate may be neurotoxic to humans (The Lancet) via environmental exposure as well as detrimental to soil health and crop nutrition (Journal: Plants). The EPA has determined glyphosate-treated crops are safe for consumption, but studies testing crops (Journal: Food) have shown residue amounts sometimes exceed legal limits, specifically on cereals, water, honey and vegetables. The health impact of consuming these foods, particularly at higher levels, needs more investigation. All of the wheat/flour Breadtopia currently carries has been grown without glyphosate.
Frequently Asked Questions
Why is my bread so dense?
A “tight crumb” aka small holes in the interior of your bread can be the result of different factors: under-fermenting, over-fermenting, and a lack of gluten development.
The most confounding part of sourdough bread baking is that the rise times of recipes are just a suggestion or range. You as the baker have to watch the dough to make sure it is fermenting nicely, and you might have to stop the process earlier if your kitchen is very warm or let the process go longer if it’s cold or if your sourdough starter is a bit sleepy or you used less than the recipe called for.
This article, Demystifying Sourdough Bread Baking, is a great read to help you understand sourdough fermentation, and here are some fermentation diagnostics to help you understand what may have happened with your dense bread:
- If the interior of your bread is a mix of very dense areas and large holes, and the loaf is relatively tall; then the bulk fermentation was likely too short and the gluten development limited, with some compensation during the final proof
- If the interior of your bread is extremely dense and the loaf is flat, then the bulk fermentation and final proof were likely too short.
- If the interior of your bread is moderately aerated but the loaf has a deflated look to it with no opening to the score, then either or both the bulk fermentation and final proof were too long.
For a more open crumb, fermentation must be accompanied by a strong gluten structure. Gluten is developed through time (no knead) and actions on the dough, such as stretching and folding or kneading. Here is a useful blog post about Gluten Development with videos showing various techniques to employ on the dough to strengthen it and allow it to hold large pockets of air.
Frequently Asked Questions
Why use a scale to measure ingredients?
Using a scale to weigh ingredients, particularly flour, is more accurate than measuring volume. The same amount of flour can have a very different volume depending on how it is stored and scooped. One baker might scoop a 120 gram cup of flour while another baker scoops a 150 gram cup of flour. This is 25% more flour, and it’s not an uncommon difference in cups even with tapping and leveling with a knife.
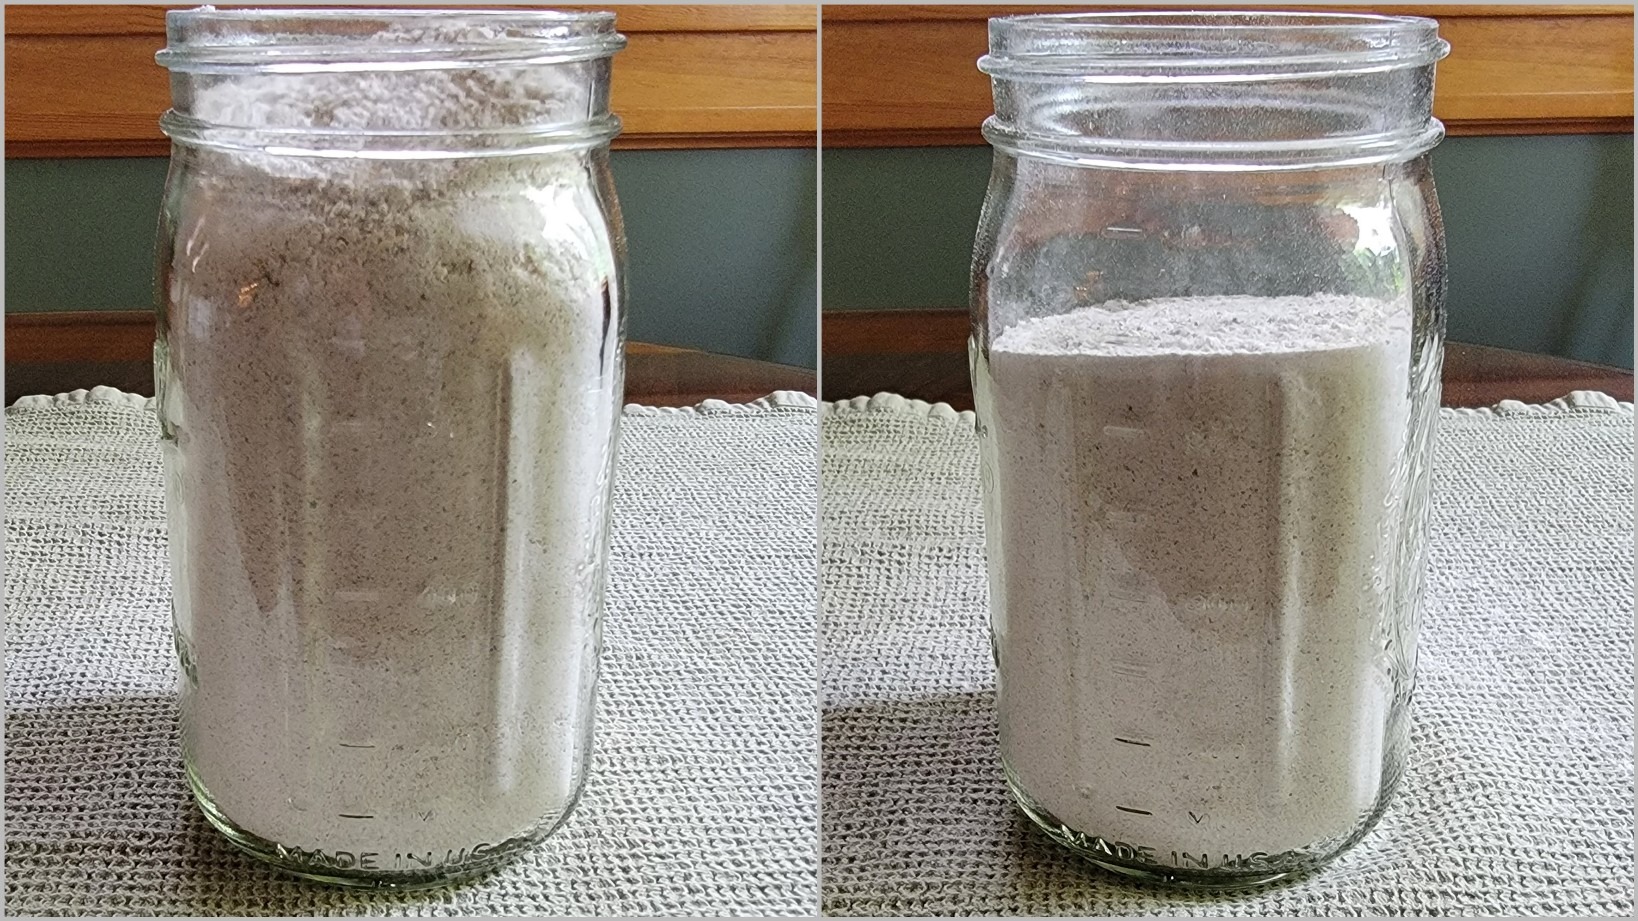
Both of these jars have 380 grams of whole grain rye flour. The photo on the left was taken just after filling the jar with flour, and the photo on the right was taken after tapping the jar a few times on the table to make the flour settle.
Of course, many people bake amazing bread without scales, and even without volume measurements. They use their senses to gauge the dough consistency. Observation, apprenticeship, and repetition are how baking traditions have been passed down for many generations. However, outside of those close-instruction scenarios, it’s probably easier to learn to follow recipes and get the intended dough consistency if you have a scale.
It is important to note though, that even weighing flour isn’t a perfect measurement solution. Scales don’t account for different humidity levels. High humidity will make the same amount of flour slightly more heavy. Moreover, dough consistency also has to do with the absorbency of the flour, which varies by brand and even by individual wheat harvest from the same farm. Bakers should always use their senses in addition to their tools and recipes.
Frequently Asked Questions
Sourdough Starter Questions
Can I feed my sourdough starter different flour?
Breadtopia’s sourdough starter is fed organic bread flour, but you can feed it a different flour if that is your preference. This is also true of starter you’ve made yourself or that a friend gave you. Even if the starter was fed a particular flour since someone’s great-great grandma made it, the microbes will adapt: whole grain vs. refined flour, thinner vs. thicker consistency. You should continue to avoid bleached flour (less wild yeast) and self-rising flour (higher pH).
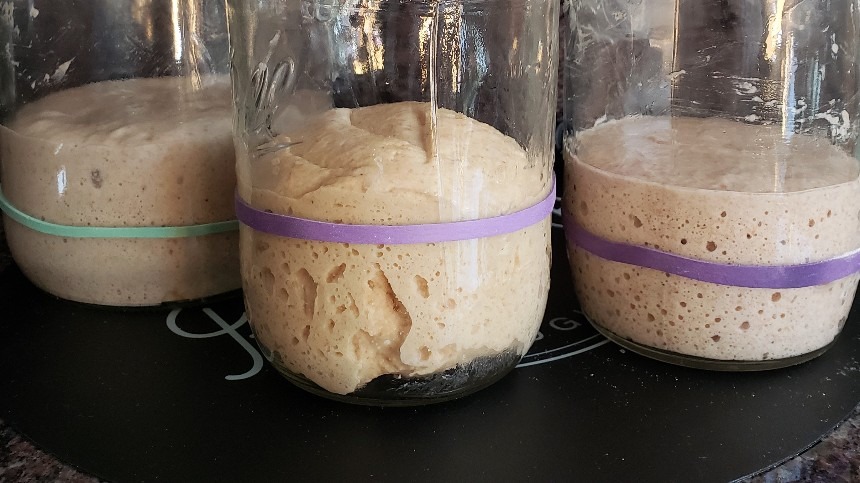
Different starters developed for recipe testing. From left to right: 100% hydration 50:50 bread flour and whole grain rye flour, low hydration whole grain durum flour, 100% hydration whole grain hard red winter wheat flour.
Breadtopia’s starter instructions recommend initially reviving the starter with all purpose or bread flour to more easily track the expansion of the starter and to have a fairly predictable feeding timeline. Refined flour forms a stronger gluten network, so the bubbles are more obviously trapped; and refined flour is consumed a little slower compared with whole grain flour. This is just a recommendation though, and it’s not difficult to monitor whole grain starter expanding in a jar and feed it a little earlier if needed. In general you should feed your sourdough starter close to when it peaks, even if this is earlier or later than when any instructions estimate. At least initially, make sure your starter has a waffle batter consistency and not thinner. Once you’re more experienced at reading your starter, you can try a more liquid starter if you prefer.
By the time you’ve done a few discards and feedings with a new type of flour, the starter will be comprised almost entirely of your new flour. This forum post by one of Breadtopia’s guest bloggers explains how changing the starter’s flour works mathematically over time. Here are a couple of recipes where the sourdough starter has been fed different flours in order to be almost 100% a specific wheat variety:
Whole Grain Spelt Ciabatta
Naturally Leavened Einkorn Bread
Here are two recipes where the sourdough starter has been made stiffer (lower hydration), and the latter recipe has sugar in the starter too, to encourage the flourishing of yeasts that will perform better in sweet dough.
Naturally Leavened Christmas Panettone
Whole Grain Sourdough Date Rolls
Finally, this article describes an experiment with feeding starter different flours and making bread with these starters and the same total flour percentages in the loaves, and this forum thread discusses flour and terroir — the regional specificity — of sourdough starters.
Frequently Asked Questions
How can I make a rye starter?
66 grams of rye sourdough starter
Why switch to a rye sourdough starter?
In my experience, one type of sourdough starter is not objectively better or worse than another. With observation of the dough, starters made from different flours, stored at different temperatures, and used at different degrees of ripeness and quantity will all leaven a lean dough. (Heavily enriched dough, like panettone or pompe à l’huile, can be a bit more tricky, requiring starters that are low hydration and very vigorous — also a warm final dough temperature.)
Different flours and processes may work better or worse for different bakers though, and I do believe that trying new techniques and ingredients is a valuable way to learn and improve as a bread baker. So the answer to why a rye starter for me is “Why not try it?”
All that said, many bakers report that their rye sourdough starters peak faster and ferment dough more quickly than refined (white) flour sourdough starters, and perhaps you’re looking for a faster process. Here’s some experimental evidence indicating this as well. Additionally, you can learn about sourdough starter pH levels, the ash content and buffering capabilities of different flours, and resulting lactobacillus quantities in this fascinating thread in our forum.
How can I make a rye sourdough starter?
If you have 3-10 days to spare, you can create a new sourdough starter using only water or pineapple juice and rye flour (or any other flour for that matter). But if you already have a thriving sourdough starter, it’s much easier to pull off a tiny bit of it to feed with rye flour and water until the original flour is essentially diluted and discarded away.
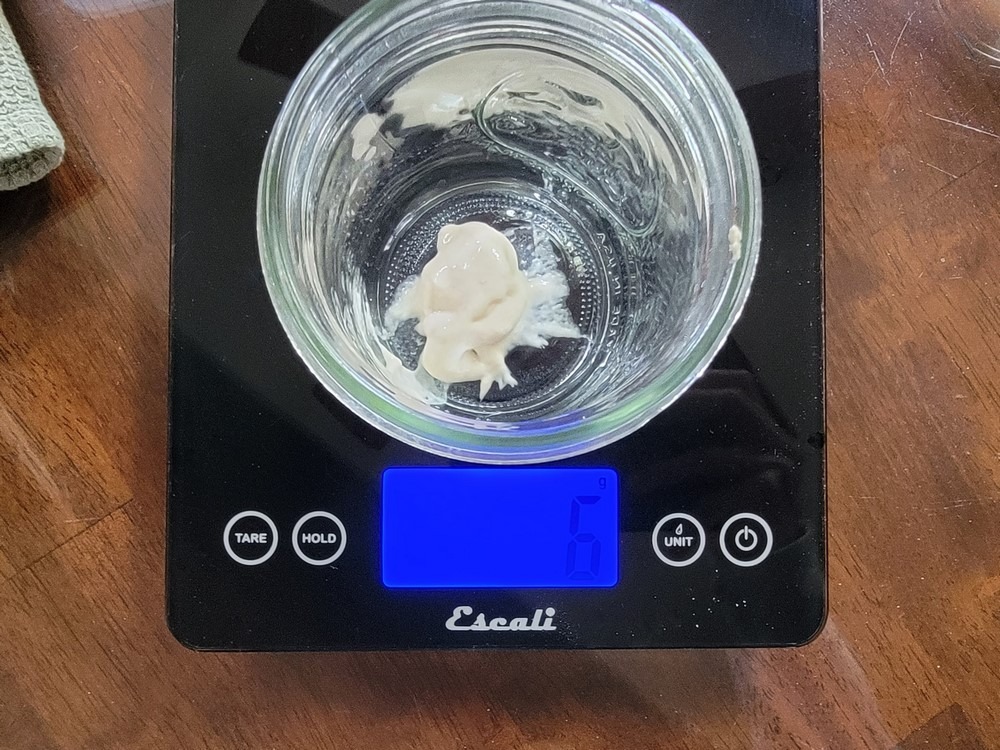
Here I’ve pulled 6 grams of all purpose flour starter from my jar in the refrigerator and put it in a new jar, and I’m going to feed it 30 grams rye flour and 30 grams water.
This is a feeding ratio of 1:5:5. One part starter to five parts flour and five parts water. This makes the ratio of rye flour to all purpose flour 10:1 because there is 30 grams rye flour and 3 grams all purpose flour in the fed jar (6 grams starter is made of 3 grams flour and 3 grams water). This starter doubled in about eight hours.

Just after feeding on the left; After 8 hours at room temperature on the right
I made pizza dough with most of the ripe rye starter (~ 60 grams) and then fed the remaining 6 grams. This second rye feed was again 1:5:5. Specifically, I fed the 6 grams rye starter with 30 grams rye flour and 30 grams water. This starter again doubled in about eight hours.
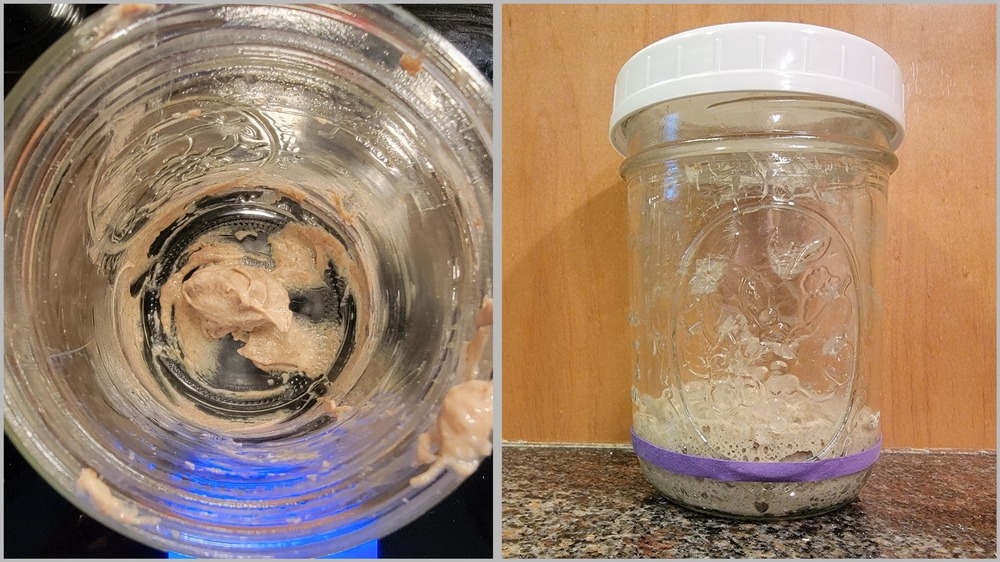
6 grams of rye starter on the left; On the right, fed and left to ferment for 8 hours and then refrigerated for later use and refeeding
The ratio of rye flour to all purpose flour after the second feeding was 109:1. The jar contained 0.3 grams all purpose flour and 32.7 grams rye flour.
You can see how with a third feed, the all purpose flour would essentially disappear.
Of course, if there’s going to be a shift in microbial populations because of the flour choice (and there is debate on this), it would likely require more than a few feedings with the new flour to take hold, but with this method, you’re guaranteed a successful sourdough starter right off the bat.
Frequently Asked Questions
How to dry sourdough starter for long term storage
There’s not much to this process. Just smear some fresh sourdough starter in a thin layer over a piece of parchment paper and let dry. Once dry, the starter will easily separate from the paper and can be ground up into small pieces and placed in a plastic ziplock bag.
Store your starter in the freezer for as long as you like. This is not a bad idea, as a routine measure, in order to backup your working batch of starter in case it meets with an unexpected demise.
Note: At the end of the video, I mention that you will find the video for reviving a dried starter below this one. I have since moved it here.
Frequently Asked Questions
How to feed starter
When working with a new starter or one that requires reviving, it’s best to use white flour (white bread flour or all purpose flour) to strengthen it and get it to a really healthy state. Once it’s robust, feel free to switch to using the flour of your choice (einkorn, rye, whole wheat, spelt, etc) to convert it, or continue to keep it a white flour starter. Use filtered or spring water to feed your starter, not chlorinated tap water and preferably not reverse osmosis water as the starter likes minerals in the water.
The consistency of your starter should be like a wet dough, or a sponge. It should be more like waffle batter and less like runny pancake batter. With starter that is too wet, the bubbles drift up through the starter rather than getting trapped and forcing a rise. An excellent benchmark of a healthy starter is one that rises well after you feed it. If your starter rises well after feeding, you can more reasonably expect your bread dough to also rise. If your starter is a wet one, feed it proportionately more flour and its consistency will thicken. If a recipe calls for a liquid starter you can always thin it out for that particular recipe.
When feeding your starter, think in terms of ratios and not in amounts. How much flour and water you feed it in proportion to how much starter you have is just as important as how often you feed it. While you don’t want to overwhelm your yeast, you also don’t want to underwhelm it. Think of it in terms of a person: a young child’s proportions are smaller than that of an adult, and therefore he/she requires a smaller portion of food. Too much food will overwhelm a child, and too little food will underwhelm an adult. Same idea.
Feed your starter equal WEIGHTS of flour and water. Water is heavier than flour, so this will produce a desirable thick, wet dough consistency.
Many people stick with 1:1:1 ratio feeds, meaning the same weight of existing starter to new flour to new water being added to the jar. Other people want a longer timeframe for their starter to mature, so they give the existing starter a higher ratio of food. For example, if you’re looking to have your starter be ripe (at peak, doubled or tripled even) when you wake up in the morning and your kitchen is warm, you might do a 1:2:2 or even 1:3:3 feed the night before.
See this FAQ if you’re struggling with your starter not bubbling or expanding after feeding.
Frequently Asked Questions
How to reactivate dehydrated starter
Each package of Breadtopia dry starter contains enough for three tries. You’ll want to use white flour (white bread flour or all purpose flour) and filtered or spring water (not chlorinated tap or reverse osmosis water). Any reasonable (read not extreme) room temperature will work just fine.
To ⅓ of the dry starter included in the package add water and flour. Keep the ratios of water to flour at about equal WEIGHTS, which will keep the mix fairly thick.
Be sure to give the starter enough time to work. Sometimes it takes several days. Once it shows signs of bubbling, feed it more water and flour to continue to build it into a strong and thriving starter.
Specifically, follow these instructions when getting started…
-
Soak 1 tsp. dried starter in 1 Tbs. lukewarm purified or spring water for a few minutes to soften.
-
Stir in 1 Tbs. all-purpose or bread flour, cover loosely with plastic and let sit at room temperature for 24 hours. While not necessary, stirring again once or twice during this 24 hours will expedite the process.
-
Stir in another Tbs. of flour and 1 tsp. of purified water and let it sit as before. Within the next 24 to 36 hours you will most likely start to see the bubbling action of fermentation begin. (If not, something is most likely wrong and you should try again).
-
Now stir in 1/3 cup flour and 1/4 cup of water to your activated starter and continue to build the starter with once or twice daily feedings until you have a sufficient quantity to use for baking (amounts vary per recipe). You may double or triple the quantity of starter with each feeding. Feeding with approximately equal weights of flour and water (vs. equal volumes) will result in a good consistency for your starter.
-
Once you have a cup or two of healthy starter, store your starter in a container with a loose fitting lid in the refrigerator. Once refrigerated, weekly feeding is sufficient to keep your starter happy. Just remember to hold back some starter when baking as your seed starter for the next time.
Frequently Asked Questions
How to store starter
Store your starter in a container with a loosely fitting top. A mason jar works well as long as the lid isn’t screwed down tight. Or a wire bale jar as long as you don’t use the rubber gasket. Latching the jar without the gasket will allow sufficient air passage but will prevent the starter from drying out.
It’s best to store your starter in the refrigerator between uses. You may bring your starter to room temperature prior to use, or you can use a healthy starter straight out of the fridge. A healthy starter will usually keep in the fridge for at least 1 week between feedings without liquid forming or discoloration or mold developing.
Frequently Asked Questions
Reviving smelly, discolored, or moldy starter
The most common reason for a good starter to go bad is not feeding it enough flour and water and/or not feeding it often enough. If your starter falls into this category, try the following method of reviving it:
- Combine 2 Tablespoons of starter with ½ cup white bread flour or all purpose flour and ⅓ cup filtered or spring water (preferably not chlorinated tap or reverse osmosis water). Discard the remainder of your starter. If your starter smelled cheesy or had mold growing on it, also add 1 teaspoon of lemon juice to lower the pH of this feeding and increase the chance of successfully crowding out the undesirable microbes.
- Let the mixture sit at room temperature. Watch for bubbling and/or air pockets over the next few hours or possibly up to a full day.
- If you see a bubbly response, feed it 1 cup white flour and ⅔ cup filtered or spring water and wait again for the same approximate timeframe. You might have to repeat this process a few times over the course of a couple of days, each time discarding all but a few Tablespoons of the starter.
If your starter is showing no signs of life, I would advise starting over, but when it’s alive and not expanding much in the 6-8 hours after feeding, that usually just means it needs to be treated differently. It’s useful to try to solve whatever problem you’re having or you’re likely to have the same problem again.
Frequently Asked Questions
What is Sourdough Starter?
In simple terms, sourdough starter is a mix of flour and water that contains a symbiotic population of microbes (saccharomyces cerevisiae yeast and lactobacillus bacteria). When you mix starter into your bread dough, you are inoculating your dough with the microbial culture from the starter and over the next several hours, the microbes eat, reproduce, and spread throughout your dough. Some of the yeasts in the starter are eating sugars in the flour and their metabolism releases by-products into the dough. One of those by-products is carbon dioxide (C02) gas: bubbles that physically expand the size of the dough. In both the sourdough starter and the dough, there is a finite amount of “food” and this is why we feed the sourdough starter regularly to keep it alive (and also why we bake the bread before too much time has passed and the dough deflates).
— from the article Demystifiying Sourdough Bread Baking by homebreadbaker
Frequently Asked Questions
What to do if your starter is sluggish or “dead”
It can be disheartening when your new (or longstanding) starter does nothing after you feed it. Maybe it has no bubbles at all. Maybe it expands just a tiny bit. Maybe it separates into layers of sludge and watery liquid. None of these are ideal scenarios when you’re hoping your starter will double in size within eight hours of feeding and eventually transform dough into a scrumptious lofty bread.
What do you do with this dead looking starter? Let’s first check some of the basics of good starter health. After we cover them, we’ll talk about what else might be happening and how to fix it.
For your starter to thrive, you should be using:
- unbleached flour (not self-rising, not bleached, not cake flour)
- unchlorinated water, filtered or bottled (not reverse osmosis, not well water with treatments, not distilled)
- a jar, pyrex, or bowl that hasn’t been super sanitized with possible soapy residue (glass is somewhat preferable as it’s easier than plastic to maintain scratch- and contaminant-free)
- a cover that is placed loosely on your container (this isn’t because the starter needs air, rather the starter can cause a tightly sealed container to explode)
If you’ve botched one of the above bullets, simply modify that aspect of your process. And still read the instructions below as the info could help you get your starter to thrive sooner.
If you’re doing all the above already, then other aspects of your starter care might benefit from being adjusted: timing, hydration, and temperature.
Timing and Temperature
Sometimes the microbes in your starter simply need time to metabolize all the feedings. This is usually the case in cold environments (AC under 70F, winter kitchens). If your starter is barely bubbling or not bubbling at all 12-24 hours after the last feeding, simply stir it again and let the jar sit for a day or two. Then feed again and see if you get bubbles. If possible, find a spot in your house where the temps are over 70F but under 85F. This could be near a warm appliance, radiator, under a lamp, in the oven with the light on, on a heating pad, or in a closed box next to a bowl of boiling water.
Sometimes the opposite is happening, and the food supply for your starter is running out long before you give it the next feeding. Usually this is the case when your kitchen is warm or you’re under-feeding the starter (giving it a small amount of water and flour relative to existing starter — see this starter feeding FAQ for info on feeding ratios). If you’ve been seeing bubbles, but your starter looks deflated or has liquid “hootch” on top by the time you feed it again, the microbes are likely metabolizing the feedings quickly. In that case, you may want to feed sooner. You can also feed more new flour and water, or use cooler water when you feed.
Hydration
Sometimes your starter is bubbly after each feeding, but it never expands or expands very little. This can mean it needs several rounds of peaking and feeding at room temperature to get a larger microbial population flourishing in it, or it may simply mean that the starter’s consistency is too thin, and bubbles are popping rather than getting trapped.
Next Steps
In all these situations, it is often helpful to thicken the starter a bit in order to better trap the CO2 and see expansion in the starter.
- At your next feeding, put all but 50g starter in a discard jar.
- Add to that 50g starter, 50g water and 60g flour.
- Mix thoroughly and clean the sides of the jar with a spatula.
- Mark the level on your jar with a rubber band and see what happens over several hours and up to a couple of days. Give the starter a vigorous stirring every 12 hours if you’re seeing no expansion. Once it starts expanding, don’t stir it so you can keep track of things.
- Your starter will eventually expand, though it may take more than a day. Don’t feed it again until it is “hungry.” This is when you see the top of the starter flatten or streaking on the sides of the jar, indicating it has risen and fallen a tiny bit.
- When the starter is hungry, assess if it barely expanded or if it came close to doubling. In the former situation, feed the starter 50g water and 60g flour without discarding (to promote lowering the pH). In the latter scenario, discard down to only 50g starter and feed as above.
- Repeat this until you get doubling before the fall of the starter. Now, the starter is ready to use for baking. Ideally, doubling will take less than eight hours. If it takes longer, you can still bake with the starter, but expect longer rise times.
If in 3 to 4 days of trying these troubleshooting tips, your starter still has no activity, you might make a post in our forum asking for help. Consider uploading pics and outlining what you’ve been doing in order to help our community of home bakers help you.
Additionally, you may want to watch these videos on making, managing, reviving, and drying sourdough starter.